This page is to do with the Service dog project.
Welcome to this page on setting your numbers and opening your cell phone and what to look for when you come to connect every thing up.
1). Now you have all the things you need to modify your cell phone first we will need to load the mobile number in to the phone make sure you have the ringer set to silent all so one touch answer turned off and one touch dial or speed dial turned on.
2). It would be best to send the signal to a mobile phone when activated as they have caller display on them now how this works is when the alarm system is activated it will turn on the relay and phone the number locked in the Sim card.
3). Now say if you put your own mobile phone number in number 5 and connected the wire coming from the relay or (Modified Peg) in this case to number five on the circuit board then this will call your mobile phone.
4). I know most Sim cards will work fine around the world if you can program different numbers in to your phone say from 2 to 9 and have speed dialing or one touch dialing set then this will work fine for you .
In the UK I tested Sim cards from the following companies O2,Orange,T-Mobile 3 Network, Virgin Mobile, Voda Phone. They all worked fine if you are going to America you will need a try band mobile phone this is down to the frequencies used check your mobile is unlocked to any network.
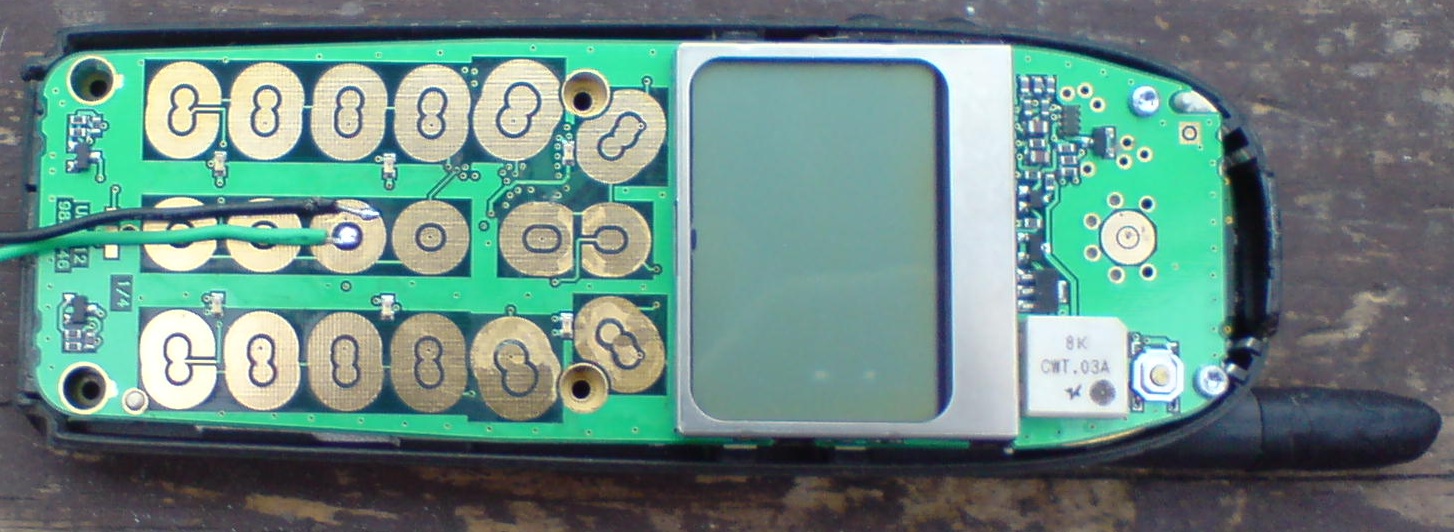
5). Now I will open my own cell phone after you have opened yours and taken out the screws you may see some thing like this as you can see from the photo below all phones have copper pads this is where we will solder our two wires from the relay if you have loaded your own mobile number in all from 2 to 9 then any one pads will allow you two connect the wire from number 2,3,4,5,6,7,8,9 pads.
In the photo above you can see the phone with case off
In the photo above you can see how the phone buttons work the white plastic card is covered with silver buttons this is carbon and is what makes the connection to the pads to put the numbers on your screen we don't need this now.
6). Now you will need to tin the two wires before you solder them to the circuit board to do this take off the cover from the wires and very carefully solder the two wires this is called tinning we do this so it is much easer to put the two wires on to the pads.
The wire in the photo above has been tined and cut short as I used wire with red and black there is no need to do this speaker wire will work fine.
7). Now look at the pads you have an inside pad and outside pad solder one wire to the inside pad be careful the inside pad does not touch the out side pad and VS or you will get a short or bridge and you will need to use cleaning tools to try and fix it. .
8). Now when you come to fix your wires to the pad put one wire in side the pad and using your soldering Iron push down on the wire this will heat the solder so it fixes to the pad do the same with the next bit of wire but connect this to the outside pad.

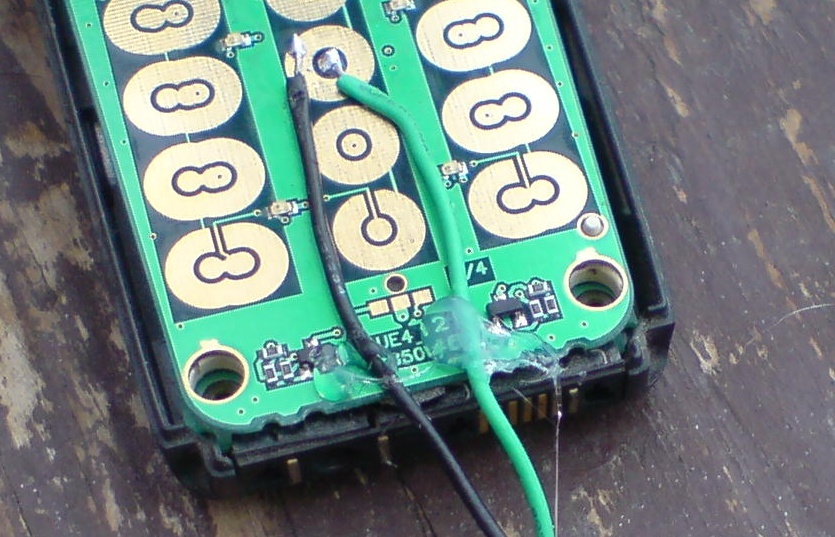
In the photo above you can see I have soldered the two wires to the in & out side pads of the modified phone in the photo above I used my Nokia phone as this was a better photo than the one I used before.
You may also want to add a little bit of hot melt glue to the bottom of the wires to take some of the stress from the solder contacts see photo below.

Any phone with touch button and one touch dial/speed dial will work.
9). Now you will need to add some PVC tape over the pads like in the photo below.
Now the modifying of the Peg below.
You will need one wooden peg the ones you would use for hanging your washing on the line with any shop or Market.
1). You will also need one roll of aluminum tape you can get this from your local DIY shop or store or on ebay Click here If you are In the USA Click here.
2). Now in the photo below you can see the peg and wire wrap a small amount of aluminum tape around the top of the peg like in the photo below best take the peg apart.
This is the second part of the set up after you have modified your cell phone.
3). Now in the photo below you can see one peg with wire fixed to it you will need to take off the covering first see the wire in my hand with the covering off the end.
4). Now in the photo below you can see how to put the wire on to the peg and just wrap some aluminum tape around the peg and wire.
5). Now in the photo below you can see how I have wired up the two wires and now push one wire in to the spring and out and do the same with the second wire don't take off any covering and do the same with the second wire see photo below.
Now on the next page we will connect every thing up Click here